QP state machine framework for Arduino
Author:  Quantum Leaps
Contact: info@quantum-leaps.com
         www.state-machine.com
Navigation
- History
- Description
- Background
- Download and Installation
- Documentation
- Examples
- More information and resources
History
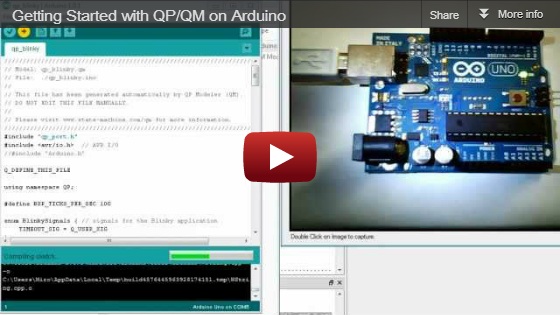
 4.5.02 2012-12-20: Added video "Getting started with QP/QM on Arduino"
 4.5.02 2012-08-25: Updated for QP 4.5.02/QM 2.2.02 and Arduino-1.0.1
 4.3.00 2011-12-16: Updated for QP 4.3.00 and Arduino-1.0
 4.2.04 2011-09-25: Updated for QP 4.2.04 and QM 2.0.00
 4.1.06 2011-02-04: Initial Release for Arduino
Description
QP is a lightweight, open source, state machine framework for microcontrollers such as Arduino. QP enables you to build well-structured and power-efficient event-driven programs as systems of concurrently executing state machines (active objects, a.k.a. actors). You can think of QP as a modern real-time operating system (RTOS) specifically designed for executing concurrent state machines. The QP framework does everything you can expect from a traditional RTOS, including fully preemptive multitasking, plus many things an RTOS can't do at all.
QP is also an excellent target for automatic code generation. To this end, QP is now supported by the the free graphical QM modeling tool, which can automatically generate complete Arduino sketches from state diagrams. Thus QP is your entry into graphical programming for Arduino.
QP improves productivity, because your programs stay responsive to new events as you keep adding them. You also no longer need to struggle with convoluted if-else logic, because this "spaghetti" code is replaced with elegant state machines. And you get a powerful multitasking support, without worrying about semaphores and other such low-level mechanisms typically found in RTOSes. Instead, you can work at a higher level of abstraction of events, state machines, and active objects.
Background
Traditionally, Arduino programs are written in a sequential manner, which means that whenever an Arduino program needs to synchronize with some external event, such as a button press, arrival of a character through the serial port, or a time delay, it explicitly waits in-line for the occurrence of the event. Waiting in-line means that the Arduino processor spends all of its cycles constantly checking for some condition in a tight loop (called the polling loop).
Although this approach is functional in many situations, it doesn't work very well when there are multiple possible sources of events whose arrival times and order you cannot predict and where it is important to handle the events in a timely manner. The fundamental problem is that while a sequential program is waiting for one kind of event (e.g., a button press), it is not doing any other work and is not responsive to other events (e.g., characters from the serial port).
Another big problem with the sequential program structure is wastefulness in terms of power dissipation. Regardless of how much or how little actual work is being done, the Arduino processor is always running at top speed, which drains the battery quickly and prevents you from making truly long-lasting battery-powered devices.
For these and other reasons experienced programmers turn to the long-know design strategy called event-driven programming, which requires a distinctly different way of thinking than conventional sequential programs. All event-driven programs are naturally divided into the application, which actually handles the events, and the supervisory event-driven infrastructure (framework), which waits for events and dispatches them to the application. The control resides in the event-driven framework, so from the application standpoint, the control is inverted compared to a traditional sequential program.
It turns out that the QP state machine framework beautifully complements the Arduino platform and provides everything you need to build responsive, robust, and power-efficient Arduino programs based on modern hierarchical state machines. Enjoy!
Download and Installation
Download latest version of QP for Arduino from SourceForge.net
The content of the qp_arduino_4.5.02.zip file is shown below:
 qp_arduino_4.5.02.zip
 |
 +-doc/                 - documentation in PDF
 | +-AN_Event-Driven_Arduino.pdf – Main documentation for Arduino
 | +-AN_DPP.pdf         – Dining Philosopher Problem example
 | +-AN_PELICAN.pdf     – PEdestrian LIght CONtrolled (PELICAN) crossing
 |
 +-examples/            - QP examples
 | +-qp/                ==> goes to the <Arduino>/examples/ folder
 | | +-qp_dpp/          – Dining Philosopher Problem (DPP) example
 | | | +-bsp.cpp        - Board Support Package implementation for DPP
 | | | +-bsp.h          - Board Support Package interface for DPP
 | | | +-dpp.qm         - The QM model file for the DPP sketch
 | | | +-dpp.h          - DPP interface (signals, events, globals)
 | | | +-philo.cpp      - Philosopher active object
 | | | +-table.cpp      - Table Active object
 | | | +-qp_dpp.ino     - QP/DPP Arduino sketch
 | | |
 | | +-qp_dpp_qk/       – DPP example with the preemptive QK kernel
 | | | +-bsp.cpp        - Board Support Package implementation for DPP
 | | | +-bsp.h          - Board Support Package interface for DPP
 | | | +-dpp.qm         - The QM model file for the DPP sketch
 | | | +-dpp.h          - DPP interface (signals, events, globals)
 | | | +-philo.cpp      - Philosopher active object
 | | | +-table.cpp      - Table Active object
 | | | +-qp_dpp.ino     - QP/DPP Arduino sketch
 | | |
 | | +-qp_pelican/      – PEdestrian LIght CONtrolled (PELICAN) example
 | | | +-bsp.cpp        - Board Support Package source for PELICAN
 | | | +-bsp.h          - Board Support Package header for PELICAN
 | | | +-pelican.qm     - The QM model of the PELCIAN crossing
 | | | +-pelican.cpp    - PELICAN active object
 | | | +-pelican.h      - PELICAN interface (signals, events, globals)
 | | | +-qp_pelican.ino - QP/PELCIAN Arduino sketch
 |
 +-libraries/           - QP libraryfolder
 | +-qp/                ==> goes to the <Arduino>/libraries/ folder
 | | +-copying.txt      - terms of copying this code
 | | +-GPL2.TXT         - GPL version 2 open source license
 | | +-qp.cpp           - QP/C++ platform-independent implementation
 | | +-qp_port.cpp      - QP/C++ port for Arduino source
 | | +-qp_port.h        - QP/C++ port for Arduino header
Installation of QP for Arduino consists of the following two steps:
- Copy the "libraries\qp" folder to "<Arduino>\libraries\".
- Copy the "examples\qp" folder to "<Arduino>\examples\".
where "<Arduino>" stands for the directory name where you've installed the Arduino IDE.
Documentation
The qp_arduino.zip file contains the following documentation in the folder doc\.
Application Note: Event-Driven Arduino Programming with QP describes the main concepts and how to build QP applications for Arduino.
Application Note: Dining Philosopher Problem describes the DPP example application (see Examples below).
Application Note: PEdestrian LIght CONtrolled (PELICAN) Crossing describes the PELICAN crossing example application (see Examples below).
Examples
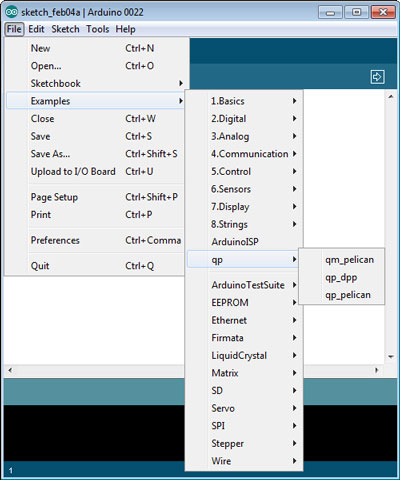
Running the QP examples on the Arduino board is very easy. As shown in screen shot below, the QP examples are integrated with the other Arduino examples in the Arduino IDE, so you just choose one of the QP examples (qp_dpp, qp_pelican, or qm_pelican).
Dining Philosopher Problem (DPP) Example
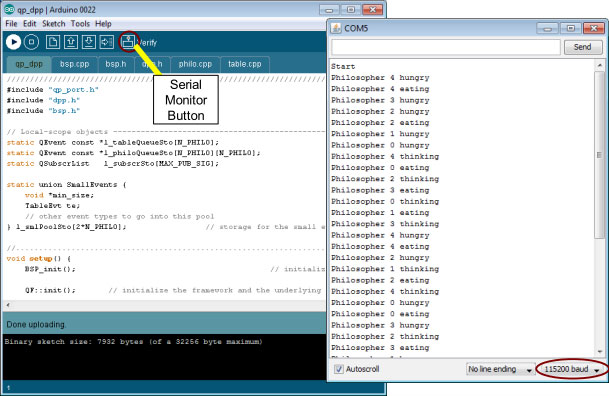
You select the example from the Arduino IDE menu Examples | qp | qp_dpp and press the Upload button. After the upload completes, your Arduino starts executing the example. You should see the User LED start to glow with low intensity (not full on). The User LED is rapidly turned on and off in the Arduino idle loop, which appears as a constant glow to a human eye. To see the actual output from the DPP example, you need to open the the Arduino Serial Monitor by pressing the Serial Monitor button or by selecting the menu Tools|Serial Monitor in the Arduino IDE. After the Serial Monitor opens up, please make sure that it is configured for 115200 baud rate. The Serial Monitor should start displaying the status of the Dining Philosophers.
PEdestrian LIght CONtrolled (PELICAN) Crossing
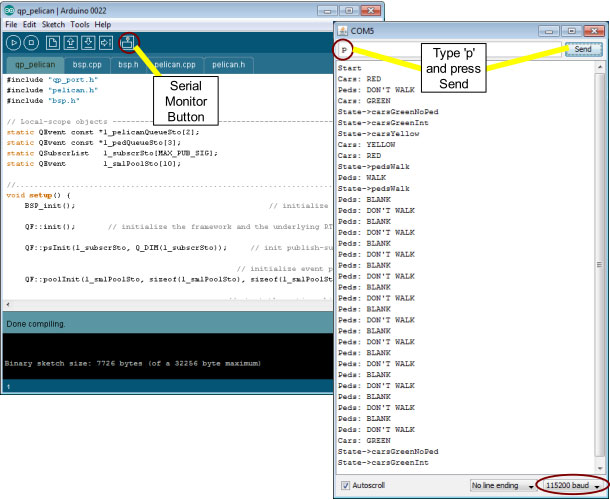
You select the example from the Arduino IDE menu Examples | qp | qp_pelican and press the Upload button. After the upload completes, your Arduino starts executing the example. You should see the User LED start to glow with low intensity (not full on). The User LED is rapidly turned on and off in the Arduino idle loop, which appears as a constant glow to a human eye. To see the actual output from the PELCIAN example, you need to open the the Arduino Serial Monitor by pressing the Serial Monitor button or by selecting the menu Tools|Serial Monitor in the Arduino IDE. After the Serial Monitor opens up, please make sure that it is configured for 115200 baud rate.
The PELICAN crossing example requires you to inject events to the application by sending key strokes via the Serial Monitor:
- 'p' for PEDS_WAITING,
- 'f' for OFF (to switch the crossing OFF for maintenance),
- 'o' for ON (to switch the crossing back online).
Modeling and automatic code generation with the graphical QM tool
The free QM modeling tool takes Arduino programming to the next level. Instead of coding the state machines by hand, you draw them with the free QM modeling tool, attach simple action code to states and transitions, and you generate the complete Arduino sketch automatically—literally by a press of a button.
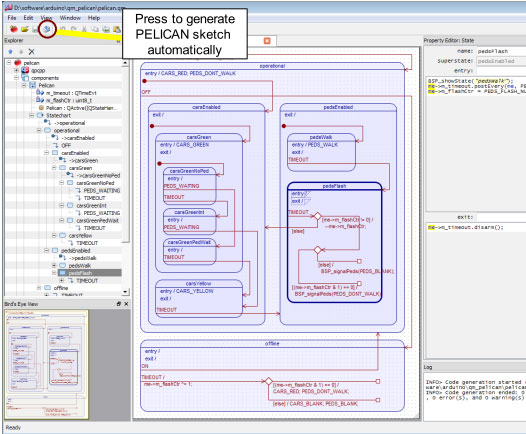
All QP examples for Arduino contain the QM model files (.qm files), which you can immediately load into QM. For example, the screen shot below shows the PELICAN crossing model (pelican.qm) open in the QM tool.
NOTE: To start working with the QM modeling tool, you need to download the tool from state-machine.com. QM is supported on Windows, Linux, and Mac OS X hosts. QM is free to download and free to use.
After you download and install QM, you open the provided model (located in <qp_arduino.zip>/examples/qp/qm_pelican/pelican.qm) and press the “Generate Code” button (see picture above). QM will then generate the complete Arduino sketch that you open in the Arduino IDE as any other sketch.
More Information and Resources
- QP Development Kit (QDK) for Arduino
- Practical UML Statecharts in C/C++, Second Edition
- Free QM graphical modeling and code generation tool
- “Using Low-Power Modes in Foreground/Background Systems”
- “QP/C++ Reference Manual”
- Circuits@Home
| Last Modified: | December 20, 2012, at 06:12 PM |
| By: | QuantumLeaps |